Are you curious about how users interact with your website content?
Tracking scroll depth in Google Tag Manager provides invaluable insights into user engagement and helps you make data-driven decisions to enhance the user experience.
In this tutorial, we’ll walk you through the steps to set up scroll depth tracking, empowering you to optimise your content and drive better results.
Header Outline:
I. Introduction
II. Creating a Scroll Depth Tag in Google Tag Manager
A. Disabling The Built In Scroll Tracking in GA4
B. Accessing Google Tag Manager
C. Setting Up Scroll Depth Variables
D. Configuring the Scroll Depth Trigger
E. Creating a New Tag
F. Publishing the Tag
III. Testing and Verifying Scroll Depth Tracking
IV. Conclusion
I. Introduction
Tracking scroll depth on your website can provide valuable insights into user engagement and content visibility. With Google Tag Manager (GTM), you can easily set up a scroll depth tag to analyse how far users scroll on your webpages. In this blog post, we will guide you through the process of creating a scroll depth tag in Google Tag Manager, allowing you to gain deeper insights into user behaviour and optimise your website’s performance.
II. Creating a Scroll Depth Tag in Google Tag Manager
To create a scroll depth tag in Google Tag Manager, follow these steps:
A. Disabling The Built In Scroll Tracking in GA4
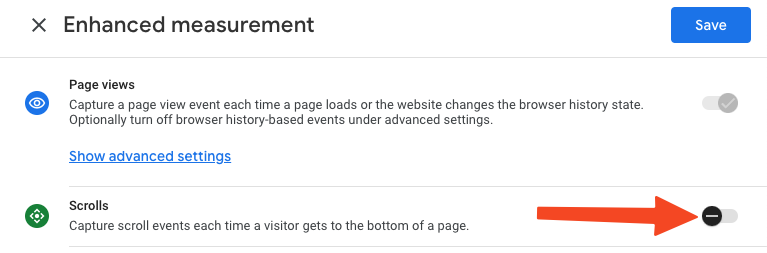
- In GA4 go to Admin => Data Streams => Enhanced Measurement
- Click on the gear
- Disable “Scrolls” by turning the toggle switch off and then save
B. Accessing Google Tag Manager
- Sign in to your Google Tag Manager account.
- Select the container where you want to create the scroll depth tag.
C. Setting Up Scroll Depth Variables
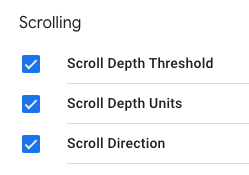
- Click on “Variables” in the left-hand sidebar.
- Click on “Configure” on the top right hand side.
- Find the section for “Scrolling” and enable all of them.
D. Configuring the Scroll Depth Trigger
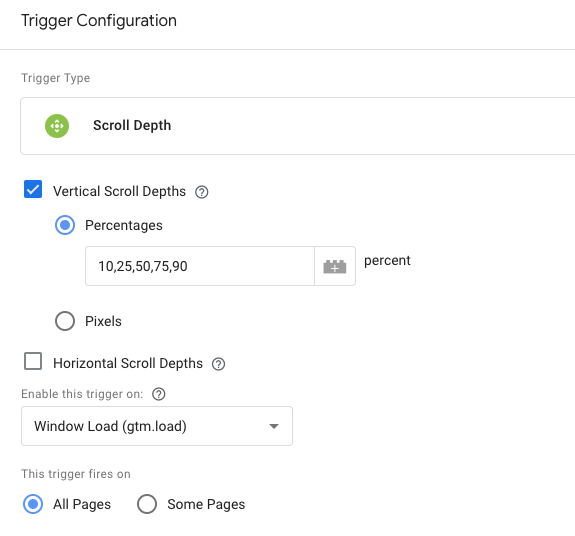
- Click on “Triggers” in the Main Menu on the left.
- Click on the “New” button to create a new trigger.
- Select the trigger type as “Scroll Depth” from the available trigger options.
- Configure the trigger settings, such as percentage thresholds and scrolling direction as shown below.
E. Creating a New Tag
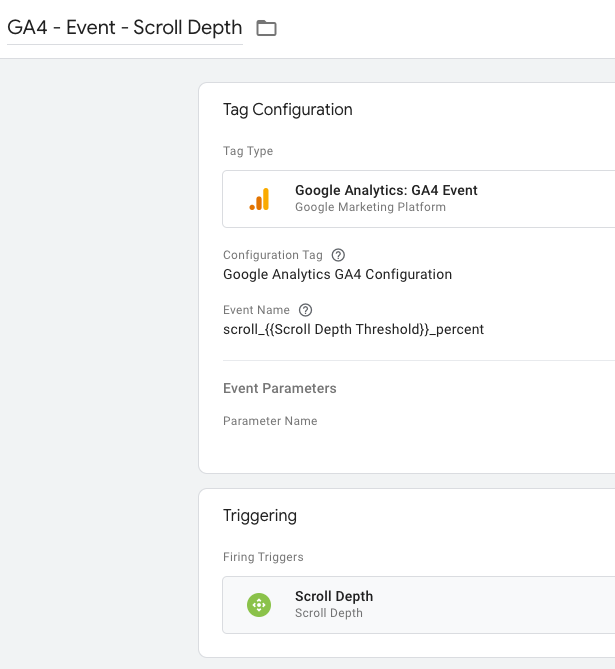
- Click on “Tags” in the left-hand sidebar.
- Click on the “New” button to create a new tag.
- Give your tag a descriptive name.
- Choose the tag configuration type as Google Analytics 4 event.
- Name the event as “scroll_{{Scroll Depth Threshold}}_percent”.
- Add the trigger as the Scroll Depth Trigger you created earlier
F. Publishing the Tag
- Click on “Submit” in the upper right corner of the GTM interface.
- Review the changes and provide a descriptive version name.
- Click on “Publish” to make the tag live on your website.
III. Testing and Verifying Scroll Depth Tracking
- Open your website and navigate to a page where the scroll depth tag is implemented.
- Use browser developer tools or Google Tag Assistant to verify that the scroll depth events are firing correctly.
- Scroll through the page and check if the scroll depth data is being captured in your analytics tool.
IV. Conclusion
By following the steps outlined in this guide, you can successfully create a scroll depth tag in Google Tag Manager.
This tag will enable you to track user engagement and analyse scrolling behaviour on your website. Ensure to test and verify the scroll depth tracking to ensure accurate data collection.
With scroll depth tracking implemented, you can gain insights into user behaviour, optimise your content, and enhance the overall user experience on your website.