
Are you looking for a convenient way to showcase your Looker Studio reports on your website or blog? Embedding a Looker report on a web page enables you to present your visualisations and data insights directly within your online presence.
In this tutorial, I’ll walk you through the steps to embed a Looker Studio report, empowering you to bring your data to life and engage your website visitors with interactive and informative visualisations.
Header Outline:
I. Introduction
II. Generating the Embed Code
A. Access the Published Report
B. Customise the Embed Options
III. Embedding the Looker Studio Report on a Web Page
A. Paste the Embed Code
B. Adjust the Embed Settings (optional)
IV. Testing the Embedded Looker Studio Report
A. Preview the Web Page
B. Interact with the Embedded Report
V. Conclusion
I. Introduction
Embedding a Looker Studio report on a web page allows you to share interactive visualisations and insights with your audience. By following the steps outlined in this guide, you can seamlessly integrate your Looker Studio report into your website, enhancing the accessibility and visibility of your data.
II. Generating the Embed Code
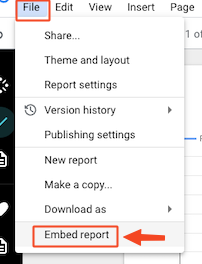
A. Access the Published Report
- Open your report in “Edit” view in Looker Studio.
- Click on the “File” menu at the top-left corner of the Looker Studio interface.
- In the “File” menu, select “Embed report” from the drop-down options.
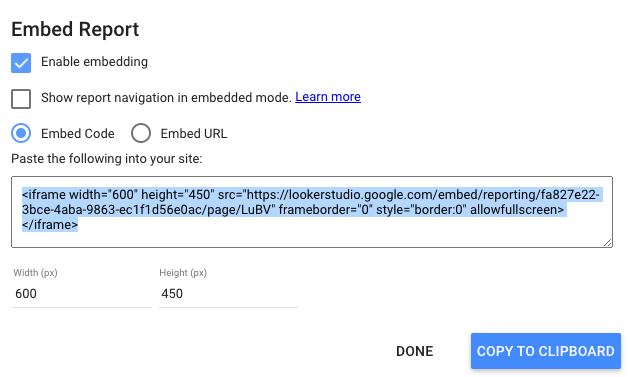
B. Customise the Embed Options
- Check the first box to enable embedding
- Customise the desired embed options, such as showing the report navigation, editing dimensions, and choosing either “Embed Code” or “Embed URL”.
- Once finished making changes, click on the “Copy To Clipboard” button.
III. Embedding the Looker Studio Report on a Web Page
A. Paste the Embed Code
- Locate the appropriate section or position in the HTML editor where you want to embed the report.
- Paste the copied embed code into the HTML.
B. Adjust the Embed Settings (optional)
- Customise the dimensions or other settings of the embedded report by modifying the embed code where needed.
- Save the changes to the HTML.
IV. Testing the Embedded Looker Studio Report
A. Preview the Web Page
- Open the web page in a browser to preview the embedded Looker Studio report.
- Ensure that the report is visible and properly displayed.
- Play around with widths and heights on both the Looker Studio page and the height and width in the embed code until happy with the result.
B. Interact with the Embedded Report
- Test the interactivity of the embedded report by interacting with the filters, charts, and other elements.
- Verify that the report functions as expected and displays the desired data visualisations.
V. Conclusion
By following the steps outlined in this guide, you can easily embed a Looker Studio report on your web page. Sharing your data visualisations in this way allows you to provide your audience with interactive access to valuable insights.
Start embedding your Looker Studio reports today and enhance the accessibility and visibility of your data-driven stories.